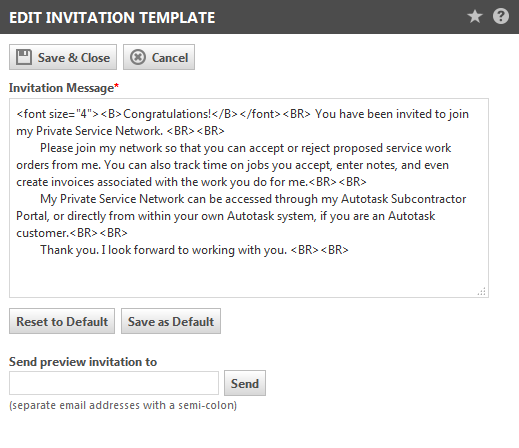
Customizing the partner invitation
PERMISSIONS Allow Partner Management
NAVIGATION Left Navigation Menu > Outsource > Partners > Edit Invitation Template
NAVIGATION Left Navigation Menu > Outsource > Partners > Invite & Manage > Edit Invitation
To outsource tickets to a partner, you must first send them an invitation from Autotask. The Edit Invitation Template allows you to customize the invitation:
NOTE You will see some minor differences between the Edit Invitation page accessed from the Autotask menu and the Edit Invitation page accessed from the Invite Partners list.
How to...
The Invitation Message field is editable and supports text or HTML.
- You can change and delete text as needed directly in the field, or compose the message in your usual text or HTML editor and then cut and paste the content into the field.
Your changes will be lost if you begin work in another area of the application unless you save the content as the new default.
The Invitation Message field automatically returns to the default message if you leave the Edit Invitation page or Invite Partners page without saving. Any edits that you have made that you do not save as the new default are lost.
You can always return to the last default content you saved:
- Click Reset to Default to return to the default message content.
You can save the edited content of the Invitation Message field as the new default invitation. This content will populate the Invitation Message field when you open the Edit Invitation page or click Reset to Default.
To save the content of the Invitation Message field as the new default:
- From Left Navigation Menu > Outsource > Edit Invitation Template, click Save & Close.
- From Left Navigation Menu > Outsource > Invite > Edit Invitation, click Save as Default.
You can send the current invitation message content field to one or more recipients to preview before sending the invitation potential partners. This is especially useful when using HTML to format the email content.
- To send a preview invitation, enter one or more valid email addresses into the Send preview invitation to field and click Send.
TIP Use a semi-colon to separate email addresses.
If you enter an invalid email address, a message opens that indicates that the address is improperly formatted. Click OK and correct the invalid address before proceeding.


