Notification panel
PERMISSIONS All users with Edit permission for the ticket, task, opportunity, CRM note, or device
NAVIGATION Click the Notification handle on the New or Edit forms of CRM notes, devices, organizations, opportunities, tasks, tickets, notes or time entries
Instead of the notification tab or the notification section, Autotask entity pages such as the Ticket, Task, Time Entry, Note, Organization, Opportunity, and Device pages feature a Notification panel.
- The panel is separate from the page. You can open it from a floating handle at the bottom of the page. The handle displays a badge that indicates how many unique notification recipients are currently selected. When recipients are selected, the badge turns orange.
- When you click the handle, the notification panel slides up.
- The panel can have three input boxes, To, Cc, and Bcc. Initially, only the To box is displayed. To display the Cc and Bcc boxes, click the links in the top right corner.
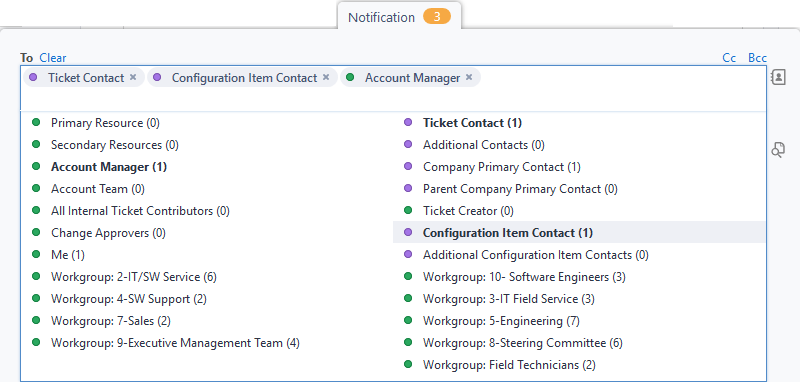
- Click in the To box to see the role-based recipients for the entity, plus all active workgroups. When you select a role-based recipient, the person currently assigned to the role will receive the notification. Internal resources and workgroups are identified by a green dot; external contacts by a purple dot.
- The email addresses of To: and CC: recipients, but not any BCC: recipients will be added to the internal note.
- If the Contact does not accept task and ticket email notifications option has been selected for an external contact, the notification email will not be sent, even if they are selected by role or name here. Refer to Notification Exclusions.
NOTE On the New Opportunity and Edit Opportunity pages, external contacts are not available for selection.
NOTE Regardless of the recipient selection on the notification panel, task and ticket notes can have an Internal or Internal & Co-managing setting that will prevent users and co-managing users from receiving notifications about notes they are not able to see.
How to...
All role-based recipients for the entity appear in the extended input box as soon as you click the To field.
NOTE Many role-based recipients appear on notification panels for more than one entity, and each entity has its own unique role-based recipients. The images in this topic were taken from ticket notifications.
- To open the page, use the path(s) in the Security and navigation section above.
- To add a role-based recipient or a workgroup to an input box, click the recipient. Each role-based, individual, or group resource you add appears in the input box in a gray bubble. You can add up to 50 bubbles to each box.
TIP When the input box does not have focus and you hover over a bubble, a tooltip will display the names of the group members.
- To remove a recipient, click the X in the bubble.
In addition to role-based recipients, you can add individual internal resources and external customer contacts to the list of notification recipients.
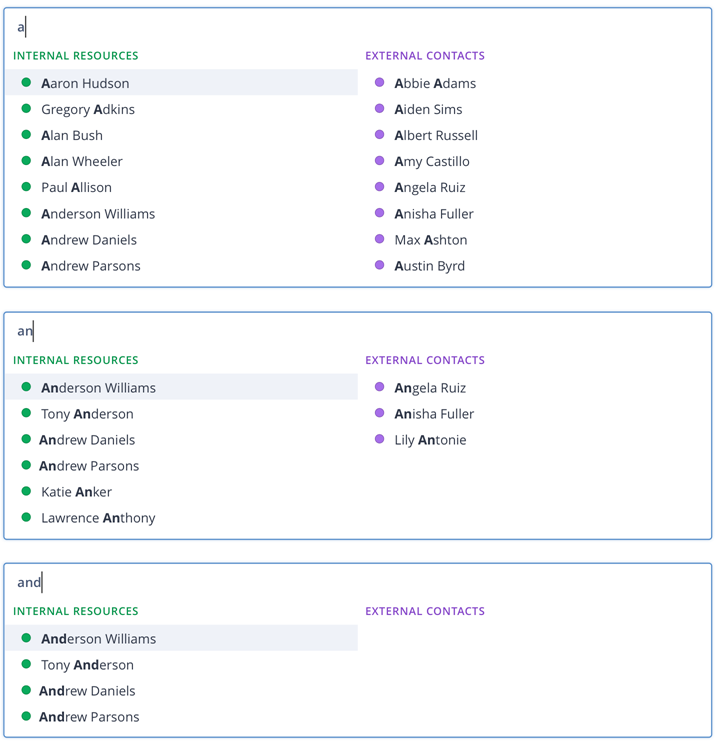
If you know the names of the individuals, you can use the typeahead feature. Autotask will search the first name, last name, and initials for a match of the string you enter.
- Begin to type a name. As you type, a decreasing number of matches is displayed.
- Click a name to add it to the input box.
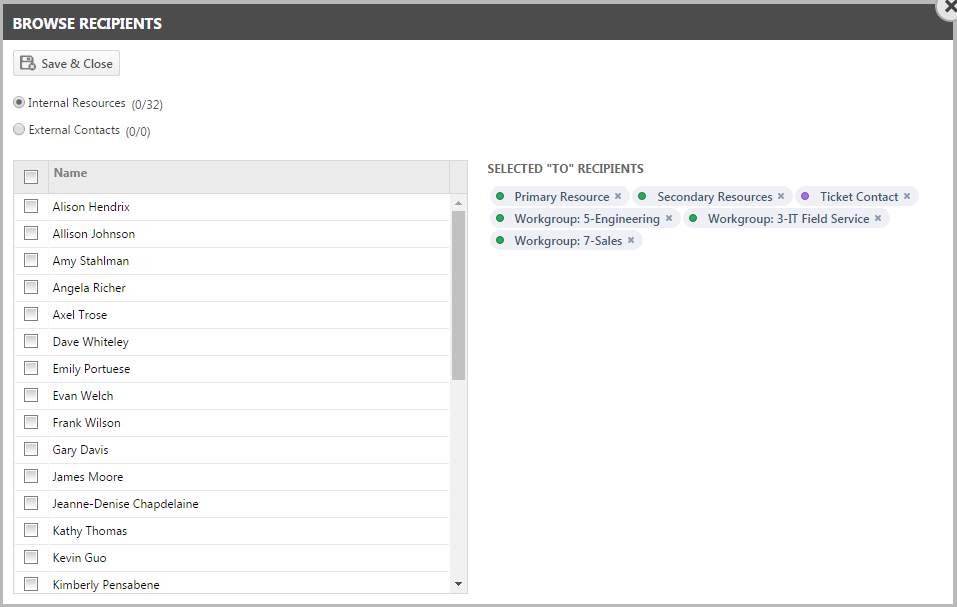
- Click the Browse Recipients icon to the right of one of the input boxes.
A window opens.
- Add recipients:
| Feature | Description |
|---|---|
| Recipient Type Selector | A radio button lets you display either Internal Resources (default) or External Contacts. The first number in parentheses indicates the number of selected resources or contacts; the second number, the total number of resources or contacts in the table. Click a radio button to toggle between the two lists. |
| Check box | To select a resource or contact as a notification recipient, click the check box in front of the name. |
| Selected To | CC | BCC Recipients | All selected recipients (including role-based recipients) are displayed on the right side of the window. To remove a recipient, clear the box or click the X on the bubble. You can add up to 50 bubbles. |
| Close Button | Cancels all changes made on this dialog box and closes it. |
| Save & Close | The selected recipients are saved and added to the respective input box, and the dialog is closed. |
In addition to role-based recipients, internal resources, and external contacts, you can send the notification to any valid email address.
- Type or copy and paste an email address into the input box and click Enter, Tab, or another area outside of the Other Email field. Multiple addresses can be separated by a semicolon.
- The email address appears in the input box in its own bubble.
Once you have selected all recipients, complete the remaining fields:
| Field | Description | |||||||||||||||||||||||||||||||||||||||||||||||||
|---|---|---|---|---|---|---|---|---|---|---|---|---|---|---|---|---|---|---|---|---|---|---|---|---|---|---|---|---|---|---|---|---|---|---|---|---|---|---|---|---|---|---|---|---|---|---|---|---|---|---|
| Template |
Notification templates determine the content and layout of the notification email. Most templates contain not only the subject line and email body text, but variables that pull data right out of Autotask. NOTE If the list of recipients includes resources who lack permission to view internal notes, attachments, etc., the text pulled by the variable is replaced with See [Entity Name]. This field appears in entities that support email notification when you create or edit them. The default template is selected, but can be modified. All active notification templates for the entity and event are available. If it is present, click the preview icon |
|||||||||||||||||||||||||||||||||||||||||||||||||
| Subject |
This field appears or is enabled in entities that support email notification when you create or edit them. It determines the Subject line for the notification email that is sent out. If you have selected a notification template, the Subject line is populated by the notification template's subject but can be modified. |
|||||||||||||||||||||||||||||||||||||||||||||||||
| Additional Email Text |
This field appears in entities that support email notification when you create or edit them. It stores additional text you want to appear in the notification email. Enter any text that you want to appear in the notification email above the attachment or above the body text defaulted in from the template. Depending on the entity, text that you enter here may or may not save to Autotask. If saved, it will be available for viewing as a system note. |
|||||||||||||||||||||||||||||||||||||||||||||||||
| Send email from |
This field determines the email address that is used as the Sender address in the notification email. Choose the email address you would like to use as the outgoing sender. Depending on the context, the following options are available: IMPORTANT Replies to notification emails will come to the selected email address. Make sure that the mailboxes are watched or the emails are properly redirected.
|
|||||||||||||||||||||||||||||||||||||||||||||||||
|
Summary Notes (Time Entry notifications only) |
Choose whether to include the time entry's Summary Notes with the notification email. |
|||||||||||||||||||||||||||||||||||||||||||||||||
|
Description (Ticket Note notifications only) |
Choose whether to include the Note Description with the notification email. |
|||||||||||||||||||||||||||||||||||||||||||||||||
|
Attachments |
On Ticket Note, Project Note, Task Note and Time Entry notifications only, choose whether to include the attachments, if any, with the notification email. This applies only to new attachments associated with the note or time entry. Existing attachments to the task, ticket, or other time entries cannot be included. |
|||||||||||||||||||||||||||||||||||||||||||||||||
| Edit Default Settings | Opportunity, ticket, task, and devices allow for setting default notification settings for an entity. These settings are specific to your user account and can be managed on the Default Notifications page. Refer to Configuring default notification settings. |


