Searching and managing services and service bundles
PERMISSIONS Security level with Admin permission to configure Products, Services, & Inventory. Refer to Admin security settings.
NAVIGATION Left Navigation Menu > Admin > Admin Categories > Features & Settings > Products, Services, & Inventory > Services
NAVIGATION Left Navigation Menu > Admin > Admin Categories > Features & Settings > Products, Services, & Inventory > Service Bundles
BEFORE YOU BEGIN Before you can set up services, you must set up service codes. Refer to Service codes.
On this page, you set up and manage the services and service bundles that are the billing items added to recurring services contracts.
To open the page, use the path(s) in the Security and navigation section above.
About Services and Service Bundles
A service is a defined benefit such as "Mail Hosting", "Disk Backup" or "Virus Checking" for a covered device. You charge a fixed fee per service period (usually monthly), which benefits your customers by providing them with predictable IT support costs. For information on recurring service contracts, refer to Offering your customers a Managed Services business model.
If your company incurs license fees or other vendor-related costs, you can associate a vendor and unit costs with the service to track and report on profitability by service or vendor.
TIP Services can be combined into service bundles. However, service bundles are always a single billing item. You cannot separate them into their constituent services after the fact. As a best practice, we recommend that you use services.
How to...
To open the page, use the path(s) in the Security and navigation section above. To see the list of services, click the Services tab. To see a list of service bundles, click the Service Bundles tab.
- To see a list of all the services or service bundles, click Search without applying any filters.
- To search for a specific service or service bundle, enter a value into the Name field. Use Choose Filters to search by other fields. For more information on searches, refer to Applying a search filter.
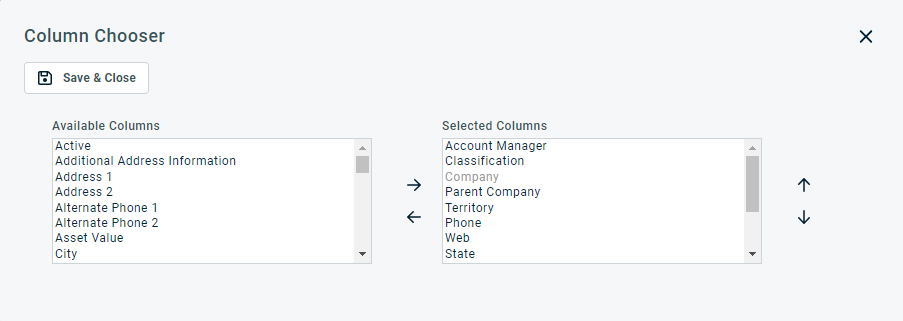
- Use the column chooser to control what fields appear in the grid.
- Which columns are displayed on the table
- The left-to-right display order of the columns
- Click the column chooser icon
 above the search results. The Column Chooser page opens.
 - Double-click a column name or select one or multiple columns and click the left or right arrow to move columns to the other panel.
- To change the display order of the columns, select one or multiple columns in the Selected Columns panel and click the up or down arrows.
- Click Save & Close.
The Column Chooser allows you to customize search results tables throughout Autotask. It determines the following:
NOTE Column Chooser settings on search results tables and some standard reports are part of the user settings stored on the Autotask server. You can log in from any computer and have your column chooser settings applied to your Autotask session. To clear the data stored in your Autotask instance and reset the column chooser settings to the Autotask default settings, click Reset Settings in My > Miscellaneous > Settings.
To customize the table, do the following:
Columns appear either in the Available Columns or the Selected Columns panel.
NOTE Top-to-bottom order in the Selected Columns list becomes left-to-right order on the Search Results list.
TIP If the characters + # appear after the column name, then that column may have multiple items returned for some rows. If that occurs, the first item will appear in the row followed by + and the number of additional items returned. To display the list of additional items, hover over the item in the column.
- To open the page, use the path(s) in the Security and navigation section above.
- To add a new service or service bundle, select the appropriate tab and click New. To edit an existing service or service bundle, locate it on the list and select Edit from the context menu
 .
. - For detailed information on adding or editing a service or service bundle, refer to Setting up your services or Setting up service bundles.
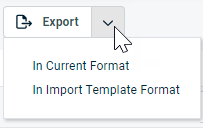
Click Export to generate a CSV list of services or service bundles.
PERMISSIONS By default, Export is available to users with Admin security level, and disabled for all others. It can be enabled for other security levels. Refer to Can export Grid Data.
NOTE When exporting to CSV: To ensure consistent date/time formatting in the CSV output, we strongly recommend that the user’s date/time format settings in Autotask be identical to the Windows date/time format settings of the computer performing the export. This will prevent conflicts in how the software that generates the report interprets the date/time format.
IMPORTANT Fields related to billing products for devices and contacts will not be exported.
- Click the Export drop-down menu and select an option.
| Option | Description |
|---|---|
| In Current Format | If you select this option or simply click the Export button, only the columns that are displayed on the search results table will be exported. |
| In Import Template Format | This option will appear for entities that can be imported. For a list of entities that can be exported in import template format, refer to Importing or updating data. If you select this option, all columns that appear on the import template for the entity will be exported. This allows you to clean up or update records in bulk, and then import them again using the Update option. |
- A window opens that allows you to download and open the exported file.
NOTE Only the first 5,000 records will be exported.
Click Import/Import History to open the Service Import History page. For general information on importing data, refer to Importing or updating data. For details on importing services, refer to Populating the Services import template.
Click View Price List to open the Price List page. On this page, users with Finance, Accounting, & Invoicing permissions can create and set prices for different types of billing items. For customers who have Multi-currency enabled and do not want to rely solely on exchange rates, this is also the page where they set fixed prices for billing items in other currencies. For more information, refer to Managing your price list.
Services and service bundles are set to active by default. Inactivated services and service bundles will keep their existing associations, but they cannot be selected on contracts or service bundles going forward.
To inactivate or activate an existing service or service bundle, complete the following steps:
- To open the page, use the path(s) in the Security and navigation section above.
- Open the context menu
 and select Activate Service/Service Bundle or Inactivate Service/Service Bundle.
 - When you inactivate a service, a warning message will appear to warn you that inactivating does not remove it from any service bundles or contracts that it is currently associated with. Click Yes to inactivate the service.
You cannot delete services that are associated with service bundles. You cannot delete services or service bundles that are associated with contracts. Deletions cannot be undone. To prevent services or service bundles from being available for future selection, you can inactivate them instead.
To delete a service, complete the following steps:
- To open the page, use the path(s) in the Security and navigation section above.
- Click the context menu
 and select Delete Service. If the service is associated with any contracts, the Delete Serviceoption will not be available. If you hover over Delete Service, a tooltip will tell you how many contracts the service is associated with.
 -
Click Yes on the confirmation message.


