Adjusting posted labor items
PERMISSIONS A security level that includes Contracts
NAVIGATION Left Navigation Menu > Contracts > Invoices & Adjustments > Labor Adjustments
About adjusting posted labor
Once items have been posted in Autotask, they are considered "billed" and are treated as revenue. To avoid discrepancies, you are not allowed to edit posted items. You must either un-post the items first and then make your changes, or give customers a credit for directly billable labor (and only labor) items that have been approved and posted or invoiced.
NOTE Non-billable labor, labor that is tracked under a Fixed Price, Recurring Services or Incident Contract and labor with a work type where the Show on Invoice field is set to "No" cannot be adjusted.
Making adjustments does not reverse the transaction; instead it creates a credit transaction that cancels out all or some of the first transaction. These adjustments will show up on the next invoice as separate line items, as well as in the invoice summary.
TIP You should only use adjustments as a last resort, when the customer has already been invoiced. Before the invoice is sent, unposting should be used.
How to ...
To search for labor items by date and other selected criteria, along with any existing adjustments to those labor items, do the following:
- To open the page, use the path(s) in the Security and navigation section above.
- Enter or select an Organization Name. Adjustments can only be done for one organization at a time, and this is a required filter.
- Optionally, change the Show filter by selecting Inactive or Active contracts. The All Contracts option is selected by default.
- If needed, change the default Worked Date range of current date minus 30 days.
- If Organizational Structure is enabled, you can also filter on a Division > Line of Business pairing. The drop-down menu will contain all active lines of business you are associated with.
- Click Search.
NOTE If Multi-currency is enabled, all amounts on this page are displayed in the customer currency.
The results appear in the table below the search filters.
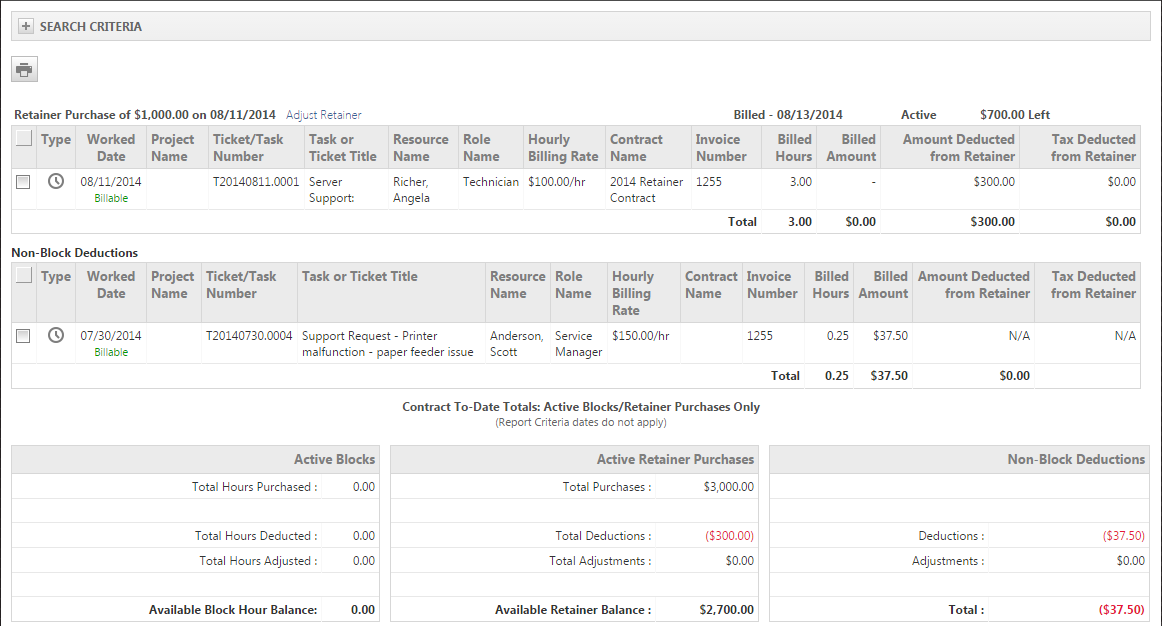
The table displays all posted and/or invoiced labor items that meet the specified date range and additional search criteria you selected. In addition to the posted and/or invoiced labor, the search returns any adjustments made to the returned labor items even if the adjustments do not fall within the specified date range.
For example, say a labor item for a retainer contract was created on March 11, and then on March 16 you adjust the labor item to return an hour of time. If you search for all labor items created between March 1 and March 15, the search returns the labor item and the related adjustment, even though you created the adjustment on March 16.
TIP Hover over an adjustment line to see the adjustment date, the reason for the adjustment, and the name of the resource who made the adjustment.
Block and retainer contract labor items and adjustments are grouped by the contract and block or retainer purchase that was applied. Labor items not charged against a block hour or retainer purchase appear under Non-block Deductions, below the block and retainer deductions. This includes block and retainer contract overage charges.
IMPORTANT Adjustments made to Block contracts are not visible within LiveReports.
A heading row separates grouped data. For each contract listed, the heading row displays the following information:
- The type of purchase (Retainer, block hours, etc.)
- The Amount (in currency or hours)
- When the purchase was made
- For Block Purchase and Retainer Purchase groups, an Adjust Block or Adjust Retainer link appears. Click this link to adjust the block or retainer purchase.
- When the contract charge was billed
- The current status of the Block or Retainer purchase (Active, Inactive, or Closed)
- The amount of hours or currency remaining on the contract
Block purchases are listed first, Retainer Purchases next, and Non-Block Deductions last.
Column Headings appear in the table below each heading row. The columns contain useful information to identify each labor item and help you to decide whether or not to approve the item.
Up to 39 columns are either displayed or available from the column chooser. The following table describes 14 of the most useful columns.
| Heading Name | Description |
|---|---|
| Selection box | To Zero Out Selected items, an item needs to be checked. Note that when one or more items are checked, Zero Out selected becomes the only available option from the right-click menu. |
| Worked Date | The date the labor was performed. |
| Project Name | Name of the associated project, if the labor entry was on a task. This column is blank if the labor was on a ticket. |
| Task/Ticket Number | Number of the task or ticket that the labor time entry was charged against |
| Task/Ticket Title | Title of the Task or Ticket that the labor time entry was charged against |
| Resource Name | The Resource who performed the labor. NOTE If you hover over an adjustment row, the name of the resource who made the adjustment and the date of the adjustment are displayed in a tooltip. |
| Role Name | Role that determined the billing rate |
| Hourly Billing Rate | Billing rate that was applied to the labor. If the labor was applied to a contract, the Hourly Billing Rate is the Contract rate. If the item is an adjustment, the rate will be the Hourly Billing Rate of the original labor item. |
| Contract Name | Name of the contract the labor was applied to. |
| Invoice Number | Number of the Invoice that included the labor or adjustment, if the item was already invoiced. If the labor or adjustment has not been invoiced, the field is blank. |
| Billed Hours | Hours billed, in decimal time entry, including hours billed against a block or retainer contract |
| Billed Amount | Calculated field: Hourly Billing rate X Actual Hours. This will display as a "-" when billing items are covered under a retainer purchase. |
| Tax Deducted on Retainer | Appears only when the Retainer Tax module is turned on. Refer to Adding tax to retainer contract items. |
| Amount Deducted from Retainer | Displays the Retainer deduction amount for rows that contain billing items covered by a retainer purchase. This will display "N/A" for non-retainer items. |
Adjustment text box
You can hover over Adjustment items to open a text box that displays the following additional information: the name of the resource who made the adjustment, the date the adjustment was made, and the reason for the adjustment.
Contract to-date totals for active block and retainer purchases and non-block deductions
The area below the transactions table provides summary data for currently active Block and Retainer purchases, deductions, and adjustments along with totals for Non-Block deductions and adjustments.
To adjust a Block or Retainer Purchase:
- Click the Adjust link (Block or Retainer) in the group heading. A window opens.
- From the Adjustment drop-down, select give back to credit hours (for Blocks) or currency (for Retainer Purchase) to the customer, or deduct another to bill additional hours or currency.
- Enter the number of hours or currency to give back or additionally deduct.
- Enter a Reason for the adjustment.
- Click Save & Close to make your changes and refresh the page. The adjustment now appears in the table below the group heading.
IMPORTANT The Adjust (Block/Retainer) link will not appear until something has been posted against the block or retainer.
Adjust transactions
You adjust transactions using a right-click menu with the following options.
This option reverses the entire line item by creating a credit transaction in the same amount. The credited amount will be displayed in the Payments/Credits field of the invoice only.
TIP To display the number of adjusted hours, not just the amount of the give-back on the invoice, use the Adjust Row option.
To zero out the row:
- Check the selection box of the row or rows.
- Right-click any selected item and click Zero Out Selected.
- Enter a Reason for the Zero Out in the text field when prompted and click Next. The page will refresh and a credit transaction will be displayed underneath each zeroed out transaction.
The Adjust Row option allows your to either give back hours or amounts, up to the total of the transaction you are adjusting, or deduct additional hours/amounts. The adjustments will be displayed as a line item on the invoice.
To adjust a row, do the following:
- Do not check the selection box, since this deactivates the Adjust Row option.
- Right-click an item and select Adjust Row. The Adjust Deduction page opens.
- To review details about the transaction, click the plus (+) sign next to Labor Item, Deduction or Contract.
- Complete the following fields:
| Field | Description |
|---|---|
| Adjustment Type | Select Give Back to credit hours or a monetary amount to the customer, or Deduct More to bill additional hours/amounts. |
| Hours to Adjust | Enter the number of hours. The Amount field is calculated. |
| Rate | Displays the System or Contract rate used for billing. |
| Amount to Adjust | Enter an amount. The Hours to Adjust and Amount to Adjust fields are linked, and the other field will be calculated. |
| Tax | The amount of tax charged on the original transaction. |
| Total Amount to Adjust | The sum of the Amount to Adjust and the Tax. |
| Use original exchange rate (instead of current exchange rate) | This check box is only displayed if Multi-currency is enabled. If the exchange rate has changed since the original transaction was posted, you can either use the original rate (the recommended option if the invoice has not been paid yet), or use the current exchange rate (preferred if the invoice has been paid.) NOTE Note that there may be some rounding errors as we reverse this calculation. |
| Reason | Enter a Reason for the adjustment. Be aware that your company may choose to display adjustment reasons on the customer invoices. |
- Click Save & Close to make your changes and refresh the page. The adjustment now appears in the table below the original item.
TIP You cannot adjust an adjustment. If you make a mistake on an adjustment, you can delete it and make another adjustment.
You can only delete adjustments, not the original transactions. If you delete the adjustment, the adjustment amount is returned to the block or retainer purchase.
If the original adjustment changed the Inactive/Active status of the associated block or retainer purchase, the deletion returns the purchase to the pre-adjustment status. For example, when an adjustment changes the adjusted purchase total to 0, the status of the purchase automatically changes to Inactive. The total is then greater than 0, and the status of the purchase automatically returns to active.
Deleting an adjustment does not reverse or delete any "overage" charges, that is, Non-block Deduction items created as a result of the adjustment. For example, an adjustment on a retainer contract item that exceeds the amount available from active retainer purchases can result in a billable Non-block Deduction created to cover the overage. If you delete the adjustment that caused the overage, returning the adjustment amount to the retainer purchase, the non-block deduction overage item still remains. If you do not want to bill the customer for that additional Non-block Deduction item, you must delete it.
Delete is not available if the adjustment has been invoiced or if the deletion will cause a deduction from the block or retainer purchase that exceeds the available block or retainer purchase amount.
To delete an adjustment:
- Right-click the adjustment and select Delete.
- Confirm the deletion. The page refreshes and the adjustment is gone.
Billing items that have not been invoiced can be moved from one block or retainer purchase to another, and even one contract to another.
NOTE If the organization has a parent organization specified, you can move billing items between the parent and sub-organization contracts.
You can move items listed under Non-Block Deductions to a Block or Retainer with sufficient Block Hours/Retainer amount. Alternately, you can convert items posted against a Block/Retainer to a Non-Block deduction, which means it is being invoiced, instead of subtracting from the Block Hours/Retainer balance.
To move a deduction:
- Right-click an item and select Move Deduction. A dialog box opens with a drop-down field that allows you to select Non-Block Deductions or a block or retainer purchase from any active contract for this customer and, where applicable, active contracts for a parent or sub-organization account.
- Select Non-Block Deduction or a block/retainer to move the deduction to.
- Click Save & Close. The page refreshes and now shows that labor entry under the Block, Retainer or Non-Block Deductions it was moved to.
IMPORTANT When a labor entry is moved to a different contract or off the contract, the billing rates that apply are now those of the new contract, or in case of the Non-Block Deduction, the default labor rates for the role.
We recommend that you only use this feature to move transactions from one block to another within the same contract, so the same billing rates apply.
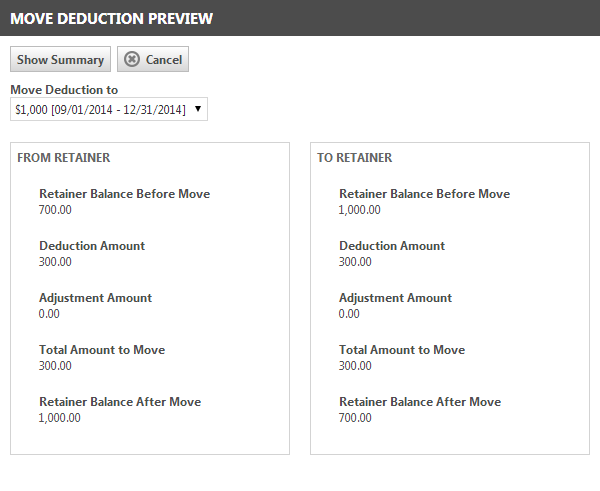
Move Preview lets you check if you have enough Block Hours left in a Block Purchase to deduct a labor item from the Block. We recommend that you do a Move Preview before you use the Move Deduction feature.
To preview the move:
- Right-click an item and select Move Preview.
- Select a block/retainer to move the deduction to.
Click Show Summary. The pop-up window will display the total hours to move, block balance before and after the move, deduction hours, and adjustment hours for both the From Block and the To Block.
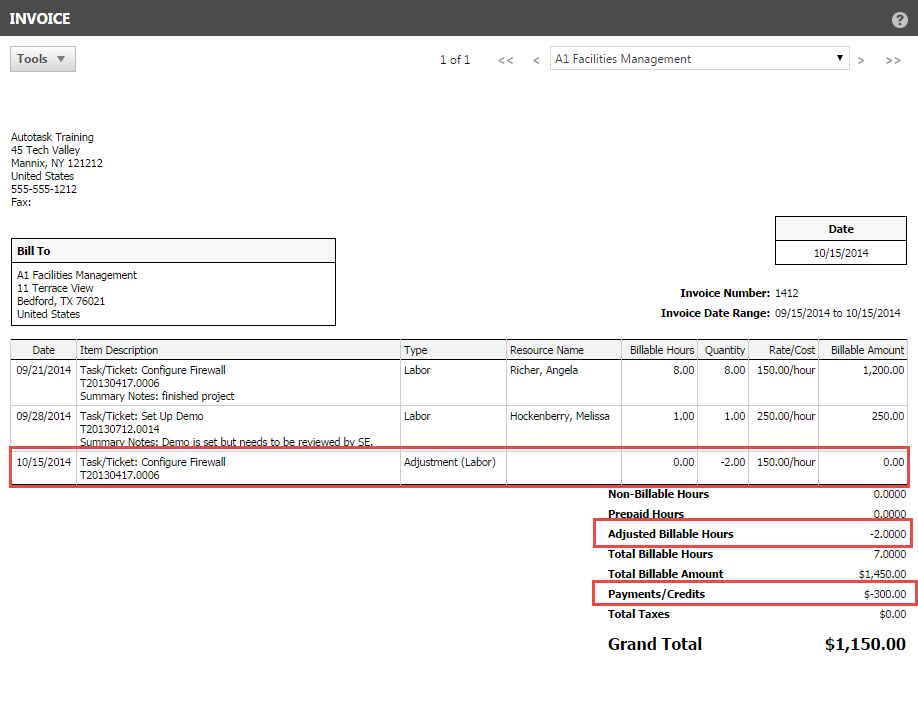
Adjustments to posted items that have not yet been invoiced will appear on the same invoice as the original transaction. Adjustments to invoiced items will appear on the next available invoice. Adjustments are displayed on invoices in the following way:
- An adjustment line item is inserted right below the original billing transaction.
- Adjustments to block and retainer purchases show 0.00 billable hours. Adjustments to Non-block Deductions show the billable amount added or deducted.
- Depending on the Invoice template used, below the invoice line items, the total number of adjusted hours for all adjusted invoice items is displayed and above the Grand Total, the total amount credited from all adjustments on the invoice is shown.
TIP You can choose to display the name of the user who made the adjustment and the adjustment reason on your invoice by editing the Invoice Template. Refer to Designing an invoice template.


