Contract Charges
PERMISSIONS Manager
NAVIGATION Left Navigation Menu > Contracts > Search > Contracts > open a contract > Menu > Charges
About charges
Charges are items that are billed in conjunction with a contract, project or ticket. Contract, project and ticket charges are virtually identical.
- Charges are used to bill for inventory and non-inventory items
- Charges are used to bill for material items that are not found on the Products list. You can select a material code, and manually fill in a Charge Name and Description fields.
- Charges are also used to track items that are not billable to the customer, which is important for calculating true profitability.
- Charges are used to bill for fees, and are one of the ways to bill your customer for mileage.
- Charges are automatically created as the billing items for block, retainer and per ticket purchases, and for per ticket contract overages. When used in this way, they remain associated with the block, retainer or per ticket purchase.
- They are created automatically and associated with a contract when users of the Xerox PageConnect/XPPS Extension are importing their invoice from Xerox. Refer to The Xerox PageConnect/XPPS Extension.
- They can also be used to bill a customer for products or inventory products that are not associated with either a project or a ticket.
When an opportunity is closed, quoted items can be directly converted into stand-alone billing items. Outside of that, charges must be associated with either a contract, project or ticket.
TIP Best Practice: Set up a "Product Billing Contract" for a customer and use the contract charge feature to bill for products without needing to set up a ticket.
The Contract Charges table
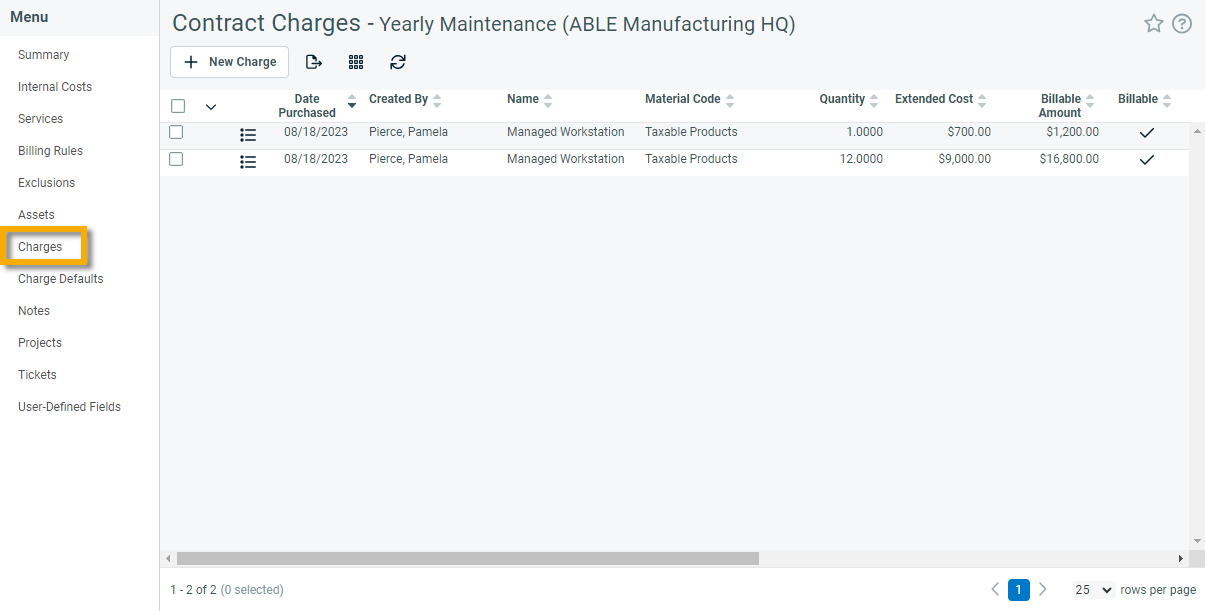
Contract Charges are accessed from the contract menu by clicking the Charges link. A table displays a list of all charges that have been created for this contract, and allows you to manage these charges.
| Name | Description |
|---|---|
| Columns | |
| Selection Check Box | Allows you to select one or more line items and perform an action on the right-click menu to all selected items at once. |
| Date Purchased | The date the charge was created. |
| Created By | The name of the user who created the charge. This system field cannot be edited. |
| Name | The Charge Name as entered on the New Charge page. If the charge is selected from the Products list, it defaults to the product name. If the charge was added via a block, retainer, or per ticket purchase, the name will default to "[material code name] [purchase start date - purchase end date]". |
| Material Code | The billing code used to bill the product or material item. |
| Quantity | The number of units being billed. |
| Extended Cost |
The cost of the item, to you, multiplied by the quantity. NOTE If you do not have permission to view internal cost data, this field is not visible. |
| Billable Amount | The price you are charging your customer. |
| Billable | Indicates that an item is billable or non-billable. A billable item will be invoiced to the customer, a non-billable item will not. Note that both billable and non-billable items will appear on Approve and Post > Charges, where your financial approver can make the final decision on whether and how much to bill the customer. |
| Billed | A check mark here indicates that the item has been approved and posted and possibly invoiced. Once the item has been billed, the charge can no longer be edited. To edit a billed item, it will need to be unposted. |
| Installed | If the charge is a product that has been installed to the customer, you will see a check mark in this column. Installed products appear on the Devices tab of the Organization page. |
| Status | The status of the charge. When Procurement is enabled, this status is set automatically depending on where the charge is in the procurement process. Refer to Introduction to Inventory. |
| Internal Product ID | The internal product ID assigned to the product associated with the charge. |
| External Product ID | The external product ID assigned to the product associated with the charge. |
| Product SKU | The SKU (stock keeping unit) number assigned to the product associated with the charge. |
How to . . .
To add a charge, complete the following steps:
- To open the page, use the path(s) in the Contract Charges section above.
- Click New Charge to open the Contract Charge page.
- For detailed information on adding a charge, refer to Adding or editing a contract charge.
To view or edit a charge, complete the following steps:
- To open the page, use the path(s) in the Contract Charges section above.
- Click the context menu
 for the charge and select View Charge or Edit Charge.
 - For detailed information on viewing a charge, refer to Viewing charge or expense details. For detailed information on editing a charge, refer to Adding or editing a contract charge.
You can quickly change the billable status of contract charges that have not yet been posted. To do so for a single charge or multiple charges, complete the following steps:
- To open the page, use the path(s) in the Contract Charges section above.
- To change the billable status of a single charge, click the context menu
 and select Make Charge Billable or Make Charge Non-Billable.
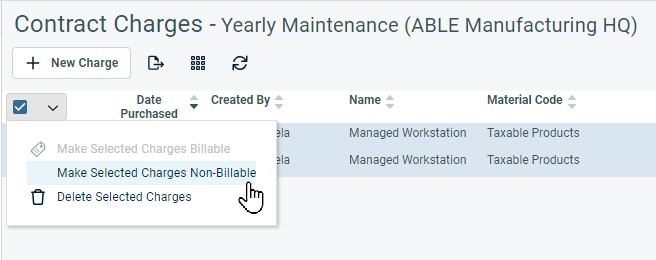
 - To change the billable status of a multiple charges, select the checkbox for each of the contract charges. Click the bulk menu and select Make Selected Charges Billable or Make Selected Charges Non-Billable. If you select some billable and some non-billable charges, neither option will be available.

NOTE Both billable and non-billable charges will still appear in Contracts > Approve & Post > Charges for financial approval.
To print a list of contract charges, complete the following steps:
- To open the page, use the path(s) in the Contract Charges section above.
- Select Export
 at the top of the charges list.
 - A CSV file containing the list of charges in the table will be downloaded. Open the list in Excel or other spreadsheet program to format it.
You can quickly change the billable status of contract charges that have not yet been posted. To do so for a single charge or multiple charges, complete the following steps:
To delete a charge or multiple charges, complete the following steps:
- To open the page, use the path(s) in the Contract Charges section above.
- To delete a single charge, click the context menu
 and select Delete Charge.
 - To delete multiple charges, select the checkbox for each of the contract charges. Click the bulk menu and select Delete Selected Charges.
- A confirmation dialog will appear. Click Yes to continue.
NOTE You cannot delete a charge associated with a block, retainer, or per ticket purchase. You must delete the purchase itself, which will in turn delete the charge as long as it has not been approved and posted.
NOTE You cannot delete charges associated with a sales order that has not been canceled. If you do not want to cancel the entire sales order, you can edit the selected charge and set its status to Canceled.


