PERMISSIONS Permission to create and edit Knowledge Base articles and documents. Refer to Knowledge Base and Documents security settings.
NAVIGATION Left Navigation Menu > Home > Search > Knowledge Base Articles > New
NAVIGATION Left Navigation Menu > Service Desk > Search > Knowledge Base Articles > New
NAVIGATION Create > Knowledge Base Article
About Knowledge Base articles
Articles store solutions for common problems. A classic example is an article about an error code for a device. The same device could be owned by many customers, and so the article is relevant to all customers who own the device. It contains no organization-specific information and thus can be published to any audience.
Manually creating an article
TIP Administrators can import articles into the Knowledge Base from a CSV file using the Import Article option located on the Manage Knowledge Base page. For more information, refer to Importing knowledge base articles.
To open the page, use the path(s) in the Security and navigation section above. To add or edit an article, complete or edit the following fields:
Refer to Creating and editing drafts.
| Field name | Description |
|---|---|
|
Article Category |
Select the Article Category the content should be created in or moved to. The category defaults to the last category you selected during the current session. If no other content was created during the current session, the selection defaults to All Articles. Only Autotask Administrators will see the Add Category |
|
Status |
The default is Active. When Active is selected, the content is available in the Knowledge Base as soon as you click Save. To hide the content from anyone but administrators and make it unavailable on article selector pages, select Inactive. |
|
Select a publishing option to determine who can view the knowledge base article. Choose from the following options:
NOTE If you publish content to an organization that gets merged with another, or a territory that gets deleted, the Publish To status will automatically default to Internal Only. NOTE The notification panel will only show external contacts if the Publish To setting is Internal & Organization. For all other Publish To selections, external contacts will not be listed. |
|
|
Organization |
Type an organization name or use the data selector to select an organization. This field will only appear if you selected Internal & Organization in the Publish To field. When it appears, it is a required field. |
|
Visible to Co-managing Users Users |
By default, new articles and documents are visible to co-managed users. To hide the article or document from this group, clear the check box. For information on the co-managed security level, refer to Co-managed setup. NOTE This field is hidden from Co-managed users, but defaults to selected. |
| Classification |
Type a classification name or use the data selector to select a classification. This field will only appear if you selected Internal & Classification in the Publish To field. When it appears, it is a required field. |
| Territory |
Type a territory name or use the data selector to select a territory. This field will only appear if you selected Internal & Territory in the Publish To field. When it appears, it is a required field. |
|
Title |
Enter a Title for the content. The title is required but does not have to be unique. |
|
Keywords |
You can enter one or many keywords for this content, separated by commas. Keyword is one of the searchable fields in a Knowledge Base search. NOTE Keyword is a single word search. If you want to use a two-word phrase as a keyword, do not use spaces between the words. For example, to use hard drive as a keyword, enter harddrive into the field. |
|
Error Code |
You can enter an error code to categorize the article or document. The Error Code field can be searched. |
If the content already exists in an external knowledge base, enter the URL that users will be directed to into the Website/URL field. The maximum length is 500 characters.
To create new content in Autotask, enter the body of your content into the Content field. For information on styling and formatting, refer to The Rich Text editor.
In this section, you add tag to articles and documents. Users with the required permissions are able to set up new tags. Refer to Tagging and Working with tags on a ticket.
On tickets, tags identify what the ticket is generally about. On Knowledge Base articles and documents, you use the same tags to describe a possible solution.
With the same set of tags available to be assigned to both tickets and Knowledge Base articles, it is possible for Autotask to suggest articles that relate to the same topics as a ticket. To find related articles and documents, you click Find a Solution in the Tags section of the ticket. Refer to Searching the knowledge base by tag.
- The use of tags is optional.
- Each article or document can be associated with up to 30 tags, but each tag can be associated with any number of articles and documents.
- Articles and documents can be associated with and disassociated from tags at any time. The Last Modified Date/Time and the Last Modified By fields will not be updated, and tag association is not tracked on the Article History or Document History page.
- When you inactivate a tag, existing associations with articles or documents will remain intact, but when you delete a tag, the tag’s associations with documents will be cleared.
- When you create a knowledge base article from a ticket, any tags will be copied to the article.
In this section, you can create a checklist that can be copied to an associated ticket.
When the article or document is opened from a ticket, a button will appear on the Checklist section that allows you to copy the checklist to the ticket. On the article or document, the checklist items are locked to prevent accidental changes to the checklist. On the ticket, checklist items will be unlocked.
Refer to The checklist.
When you create a new article or document, you can relate different types of entities to the new content item.
To relate an item, start typing, or click the selector icon![]() next to the search field and select one or multiple items.
next to the search field and select one or multiple items.
The New and Edit pages for each entity feature a notification panel that is accessed from a persistent handle at the bottom of the page.
For more information, refer to Notification panel.
Editing existing articles
- Open an article or document and click Edit or, from the context menu on a content list, select Edit Article or Edit Document.
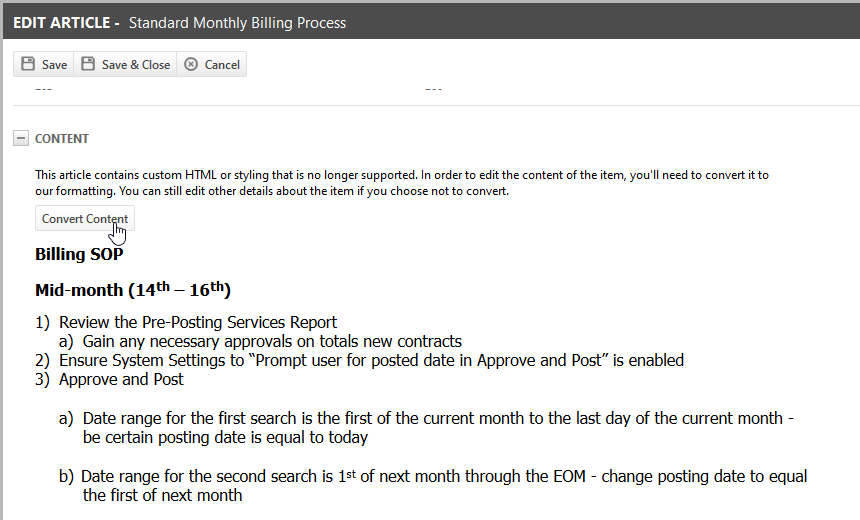
The page will open in Edit mode. All fields that appear in New mode also appear in Edit mode. Additionally, at the bottom of the page, the Activity and Attachments accessory tabs are displayed. Refer to Adding notes to articles and documents. - Update fields as needed. If you need to edit content that was created in the Autotask HTML editor, not the Rich Text Editor, you must convert the text to Rich Text. Refer to Updating legacy HTML formatting in the Content field.
To unlink a related item from an article or document, do the following:
- Open the article or document in View mode.
- Scroll to the Related Items section.
- In the Related Tickets field, click the x at the end of the name of the ticket you want to unlink and then click Save.
The ticket no longer appears in the list of related tickets. The Knowledge Base section of the deleted ticket's detail page no longer displays a link to the content.
Knowledge Base previously used our HTML editor to enable users to use custom styling and images in the content area. Autotask is now using the newer Rich-Text editor, and custom HTML formatting is no longer supported. All new content will be created in the Rich-Text editor. Refer to The Rich Text editor.
Viewing legacy content with custom HTML, and even making a copy of a legacy article, will continue to be supported, but you will not be able to edit such content. In order to edit legacy content, you must convert it to Rich Text.
To convert legacy HTML to Rich Text, do the following:
- Open the article in Edit mode.
- In the Content section, click Convert Content.

- A message will let you know about possible formatting changes.

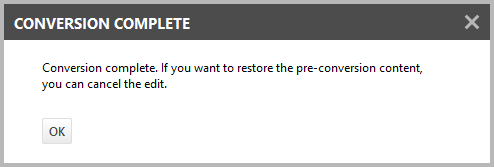
- Click Continue. A message will let you know that you can restore the pre-conversion content by canceling the edit.

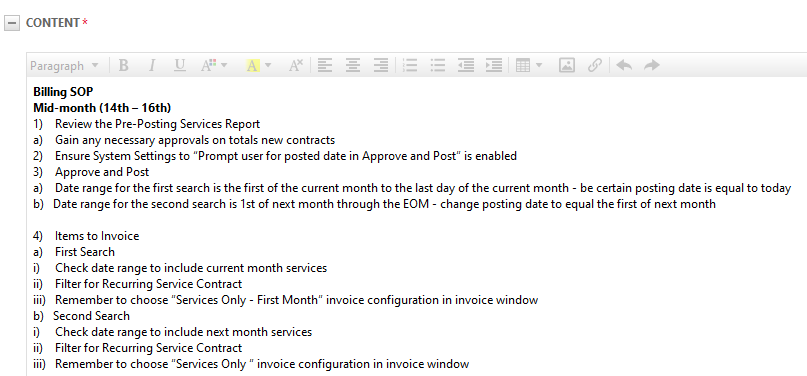
- Click OK. The converted content will now appear in the Rich-Text Editor.

- Make formatting adjustments as needed, and click Save. To restore the pre-conversion content, click Cancel.
NOTE To edit Knowledge Base content in Safari, you must go to the Tools option and clear the option for Block Pop Up Windows.
Document notes and attachments
Refer to Adding notes to articles and documents.


