Adding or editing a single or first web connector
PERMISSIONS Admin access to the QuickBooks data file and security level with permission to configure the QuickBooks Extension. Refer to Admin security settings.
NAVIGATION Left Navigation Menu > Admin > Admin Categories > Extensions & Integrations > QuickBooks Extension > Web Connectors
BEFORE YOU BEGIN Refer to MUST READ: Autotask and QuickBooks requirements.
VIDEO Configuring the QuickBooks Web Connector
SHOW ME Want to learn how to set up this feature? Log in to Autotask and begin the walk-through. (Feature access required)
Step by step
You create and manage web connectors on the QuickBooks: New Web Connector page and the QuickBooks: Edit Web Connector page.
IMPORTANT Internet Explorer is not supported.
Complete the following steps in Autotask and the QuickBooks Web Connector application.
Indicates this step is performed in Autotask
Indicates this step is performed in the QuickBooks Web Connector application
- Log into Autotask as an administrator.
- To open the page, use the path(s) in the Security and navigation section above.
- Click New. The QuickBooks: New Web Connector page will open.
- Click Download Web Connector. You will be redirected to an Intuit site.
- Click Download, unzip and install the QuickBooks Web Connector. A .zip file is downloaded.
- Choose a location and extract all files.
- Right-click on the QBWebConnectorInstaller file and select Run as Administrator.
- Follow the steps in the InstallShield Wizard and accept the license agreement.
- Click Finish and return to the QuickBooks: New Web Connector page.
In this step, you assign the name that will identify the web connector file.
IMPORTANT The first web connector you create will be the default one. All Autotask organizations are automatically assigned to the default web connector. You cannot change the default to a web connector you create later, or delete a web connector, so please be deliberate when you create your first web connector.
If this is the first web connector you are creating and you will be adding additional ones, best practice is to name it the same as the QuickBooks organization file it will be associated with, and add (default) to the name you are assigning.
From the Communicate with QuickBooks As (Resource)* field, select the Autotask API account that QuickBooks will use to authenticate the web connector to Autotask. This user account must have an API User (API only) security level with a tracking identifier. We strongly recommend that you create a dedicated user account that is not used for any other purpose or integration.
- If you have previously set up an API user account for the QBWC integration, click the drop-down menu and select it from the list. The list will contain only resources with an API user security level.
- To learn how to set up an API user for an integration, refer to Create an API user account for the QB Web Connector integration.
In this step, you will download the AutotaskQBWC.qwc file that will connect your Autotask instance and the QuickBooks data file you want to transfer data to. The QWC file contains the information needed for QBWC to communicate with the Autotask web connector you just configured.
Each QWC file you download is unique. In a single user / single QuickBooks company file setup, you will only need to download this file once. You will need to download a new file if your local organization's file location changes, for example if you need to re-map the drive your QuickBooks file is located.
IMPORTANT In most cases, you only download one QWC file. You will need to download multiple files if you would like to configure the integration for multiple users. Refer to Configuring the integration for multiple users.
-
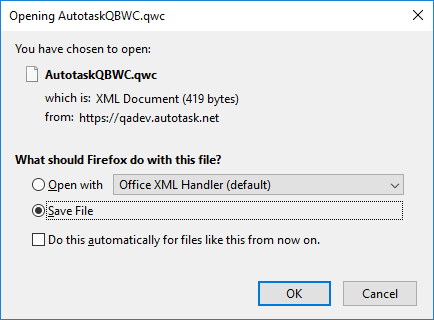
 Click Download .qwc File and select Save File.
-
 Click OK. The file is now located in your Downloads (or another selected) folder.

Do not open the web connector from the Downloads (or any other) folder. Instead, open QuickBooks as an administrator. -
 Open QuickBooks on the same physical or virtual machine where you are running Autotask and where the Web Connector application is installed. You must run QuickBooks as an Admin in single user mode to successfully complete the configuration.
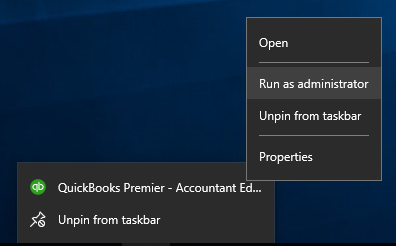
IMPORTANT If this is the first connector you are setting up, it must be the data file that will be your main QuickBooks file. During the first handshake sync, the web connector will transmit the QuickBooks financial accounts and classes to Autotask. Changing this later will create a lot of extra work, since all mapping settings will be cleared.
-
 In QuickBooks, select File > App Management > Update Web Services.
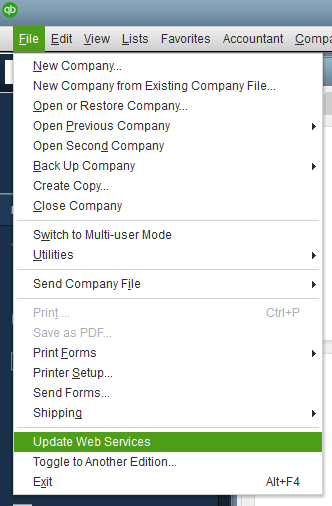
The QuickBooks Web Connector dialog box will appear. If this is the first web connector you are configuring, the list will be empty.
IMPORTANT Customers who use a non-US version of QuickBooks Desktop will not see the File > Update Web Services path. They can add the downloaded QWC file to the web connector by either:
• Double-clicking the downloaded QWC file
• Searching for the QuickBooks Web Connector app on their local machine or server, clicking Launch > Add an application, then adding the QWC file.
-
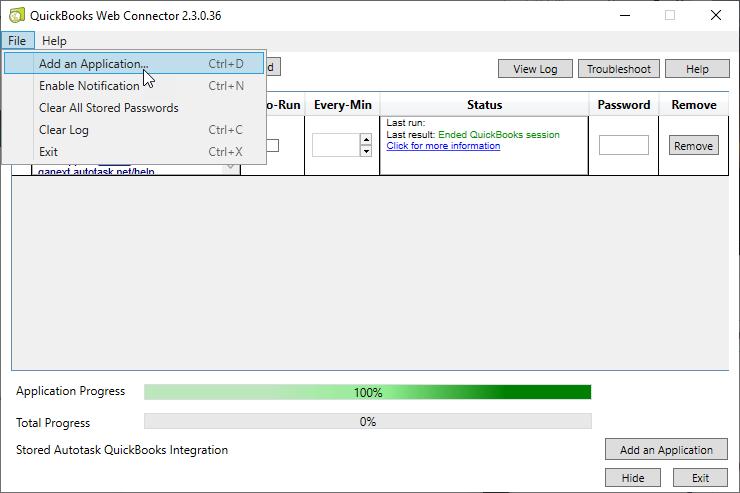
 In QuickBooks Web Connector, click Add an Application and browse to the AutotaskQBWX.qwc file in your Downloads (or other) folder.
-
 If required, authorize the new web service and give permission to access the company file.
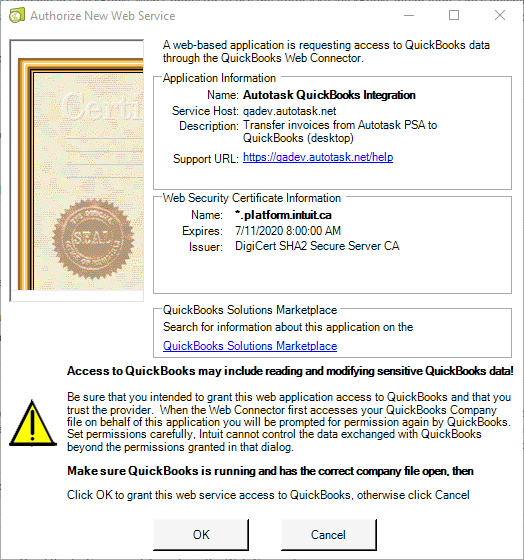
-
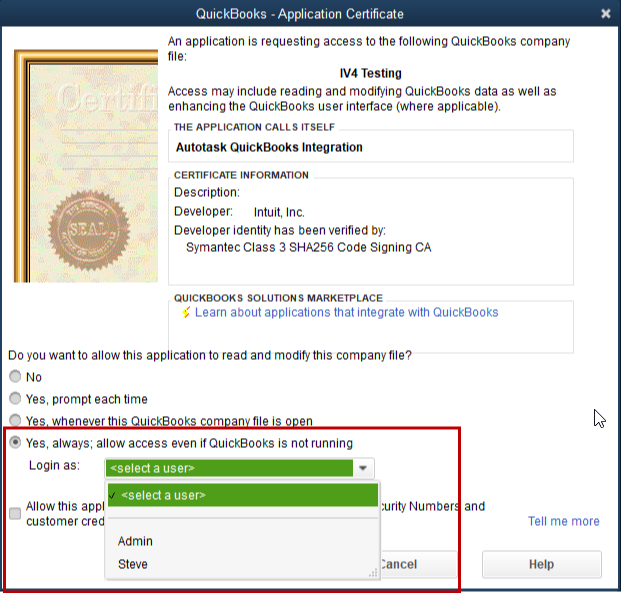
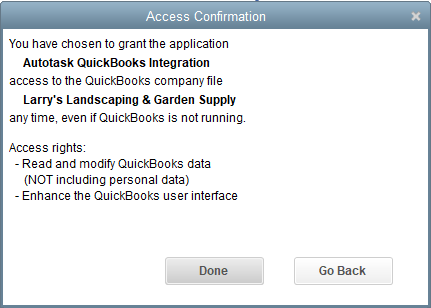
 If you are planning to set up the integration to automatically transfer data to QuickBooks at predetermined intervals, instead of having a QuickBooks user initiate the data transfer, we recommend that you select Yes, always; allow access even if QuickBooks is not running. Then you don't have to have QuickBooks open for the web connector to pull data out of Autotask, and you would only need to access the web connector to disable or update auto-run, or access the logs. Your QuickBooks admin user account used to configure the integration and your Autotask API-only user account will be used for authentication.
-
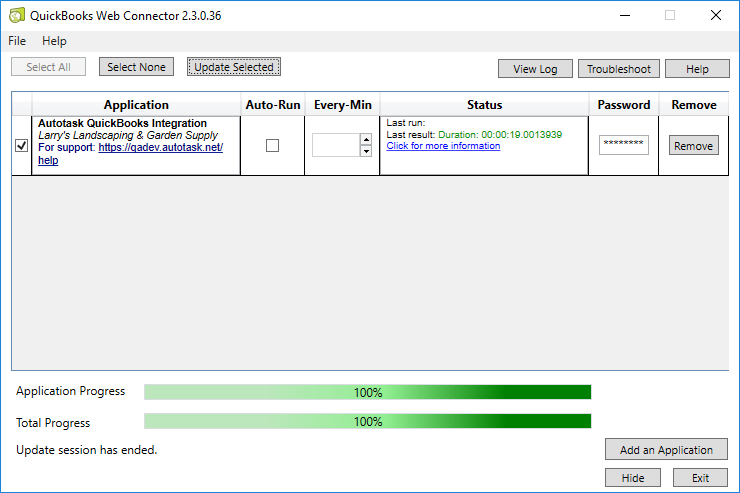
 Select Autotask QuickBooks Integration and click Update Selected. This will initiate a required test sync, and transmit the location of the QuickBooks company file to Autotask. Do not select Auto-Run for this test connection.
 -
 When prompted, enter the password for the API user account whose credentials are used to access Autotask, and save the password in the connector.
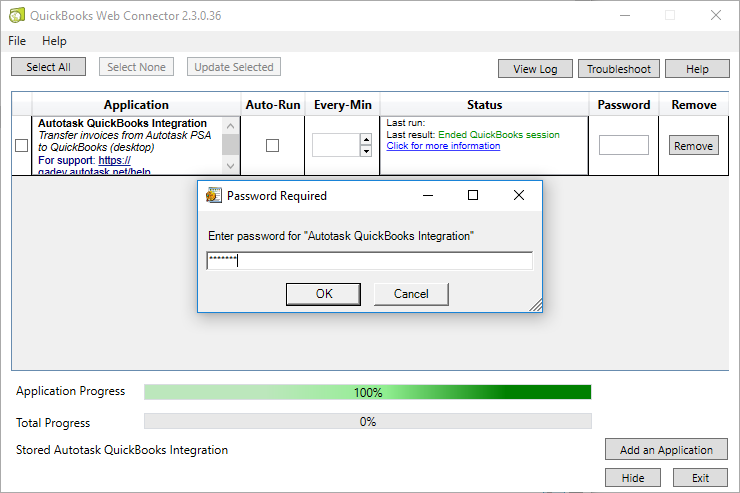
Status bars will let you know when the process is complete.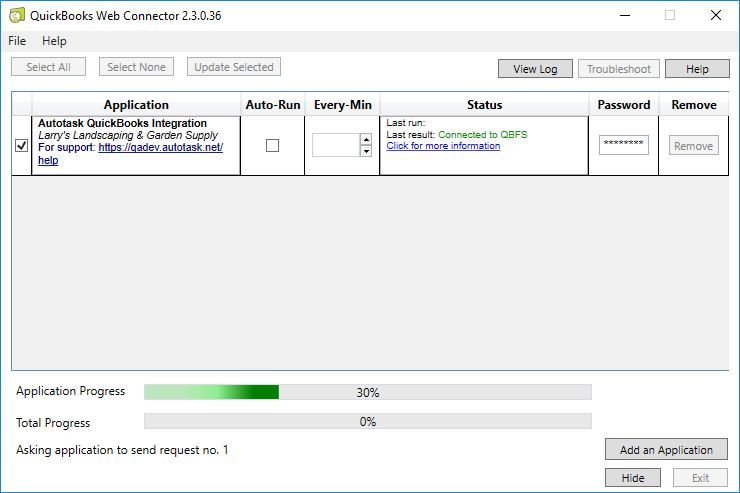
-
 Once the configuration is complete, return to this page and select Auto-Run. Enter a sync interval (in minutes). The minimum sync interval is 15 minutes.
If you selected Auto-Run and something prevents a successful connection, Auto-Run is suspended for over 90,000 minutes (62 days or more). The number of minutes also serves as an error code:
| If the number of minutes suspended is / code displayed in Every-Min column is... | The error message is... |
|---|---|
|
90100 |
Autotask could not be found. |
|
90101 |
Autotask has moved to a different location. Web Connector configuration file must be downloaded again and reinstalled. |
|
90200-90299 |
The Autotask account is in a status that prevents authentication. |
|
90300-90398 |
User is in a status that prevents authentication. |
|
90399 |
User not API user. |
|
90400 |
Password expired. |
|
90401 |
Password expired and a strong password is required. |
|
90500-90599 |
Invalid credentials. The last 2 digits are the number of attempts left before the user will be locked. |
-
 Return to the QuickBooks: New Web Connector page or the QuickBooks: Edit Web Connector page in Autotask to complete the setup.
After you have configured and run the web connector in QuickBooks, return to the QuickBooks: New Web Connector page or the QuickBooks: Edit Web Connector page in Autotask and confirm that this web connector is linked to the correct QuickBooks data file.
If the file was open while you configured the web connector in QuickBooks, click Refresh![]() at the top of the page. The QuickBooks Company File Location should now be displayed.
at the top of the page. The QuickBooks Company File Location should now be displayed.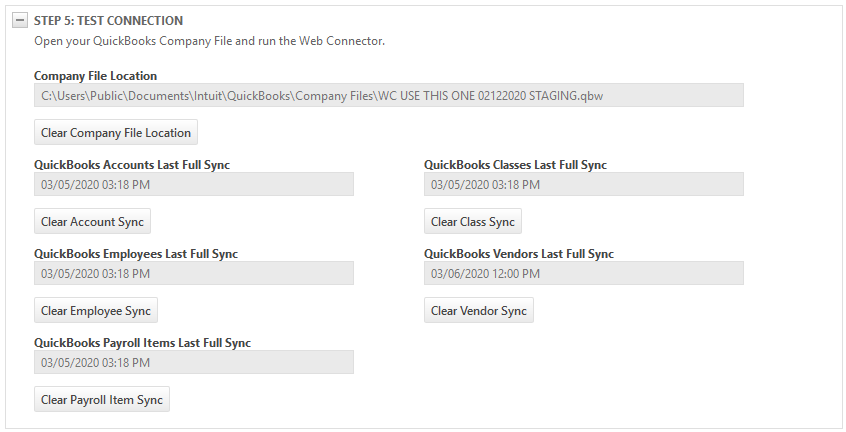
The QuickBooks financial accounts, classes, employees, vendors and payroll items have now been synced to Autotask and are available for mapping. Refer to Autotask to QuickBooks Mapping.
Any deletions in QuickBooks will be synced every 24 hours, or manually on demand.
Refer to the following table:
Save and close this page.
IMPORTANT STOP!
Synchronization is initially disabled to give you a chance to complete and review your mappings. Before you enable the transfer and synchronization of data from Autotask to QuickBooks, which will immediately initiate the transfer of all items flagged as Ready to Transfer, you must complete a number of data mapping tasks. The specific tasks will depend on the types of items (invoices, purchase orders, etc. ) that you are planning to transfer. Review the following topics: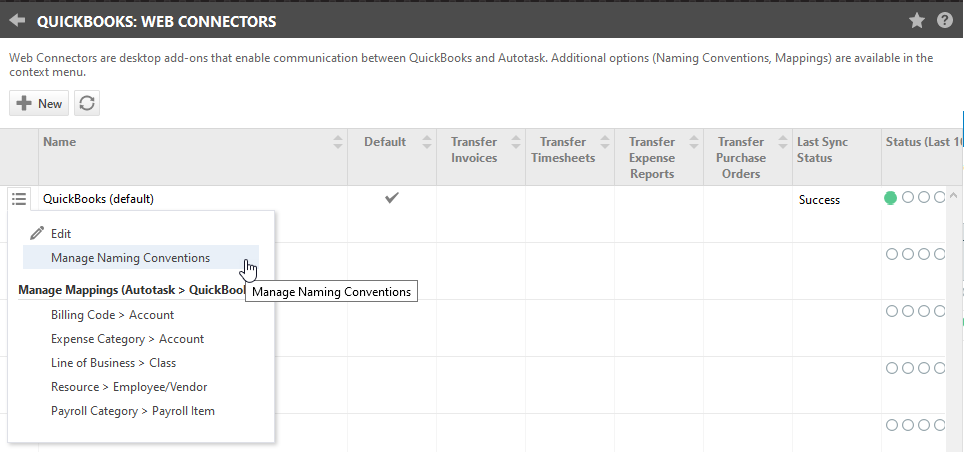
- Managing Naming Conventions
- Autotask to QuickBooks Mapping
- Any referenced topics that apply to your transfer selection
After you have completed the final mapping steps, you must return to the QuickBooks: Edit Web Connector page in Autotask and selectively enable the transfer of items for this web connector.
You have the option to receive email notifications when transfer errors occur. To enable these emails, enter one or more email addresses into the Email(s) field, separated with a semi-colon.
The recipients can use the Transfer History pages to troubleshoot the error. Refer to Transfer history pages.
US QuickBooks users have the option to calculate taxes in Autotask and then transfer the tax amounts to QuickBooks.
IMPORTANT For the record, we strongly advise new customers against doing this. We continue to make this feature available to support a number of legacy customers who depend on this workflow.
Refer to Calculating taxes in Autotask instead of QuickBooks? (US versions only).
And finally...
When you select a transfer option, any items that were set to Ready to Transfer will be queued up and transferred as soon as the settings are selected and the web connector file is saved.
The following transfers can be individually selected:
| Check Box | Description |
|---|---|
|
Transfer Invoices and Sync Paid Date |
Selecting this box will initiate the sync of invoices with a status of Ready to Transfer to QuickBooks (Pending or Pending/Failed). If a Paid Date was added in QuickBooks, it will be transferred back to Autotask. Paid dates up to 6 months in the past will be synced to Autotask. |
|
Transfer Timesheets |
Selecting this box will initiate the sync of approved timesheets with a status of Ready to Transfer to QuickBooks on the Timesheet Search page (the QuickBooks transfer date is Pendingor Pending/Failed). The data from the Autotask timesheet will populate the QuickBooks Weekly Timesheet. |
|
Transfer Expense Reports |
Selecting this box will initiate the sync of approved expense reports with a status of Ready to Transfer to QuickBooks on the Expense Report Search page (the QuickBooks transfer date is Pendingor Pending/Failed). The data from the Autotask expense report will generate a bill payable to the resource's vendor record in QuickBooks. |
|
Transfer Purchase Orders & Sync Inventory (from transferred Purchase Orders) |
Selecting this box will initiate the sync of purchase orders with a status of Ready to Transfer to QuickBooks on the Purchase Order Search page (the QuickBooks transfer date is Pendingor Pending/Error).
If you have multiple web connectors enabled, note that inventory sync can only be enabled for one of them. The same Autotask inventory cannot be synced to multiple QuickBooks files. |
|
Sync Inventory during next QuickBooks-initiated communication |
Selecting this check box will sync your entire Autotask inventory to QuickBooks, not just items that were part of a transferred purchase order. After the sync, the check box is cleared. This type of sync should only be performed after an inventory count. IMPORTANT For inventory sync, QuickBooks must be opened in single-user mode. When QuickBooks is in multi-user mode, the entire transfer batch will fail, the sync checkbox will be unchecked, and the sync time will not be updated. |
|
Last Inventory Sync |
The time stamp of the last time a full inventory sync was completed. |
|
QuickBooks Income Account (for new inventory items) |
If an inventory item you are syncing to QuickBooks cannot be mapped, Autotask will create a new item in QuickBooks. Select the QuickBooks Income Account you would like to associate with the new inventory item. If you made no selection, the financial account defaults to the Autotask Income from PO account. If this account doesn't exist yet, we will create it. |
NOTE We recommend that for each transfer type, you set a small number of items as ready to transfer and do a test run.
Next steps
While you are now ready to transfer data to your QuickBooks Organization File, we recommend that you review the configuration topics for each type of item you will be transferring:


