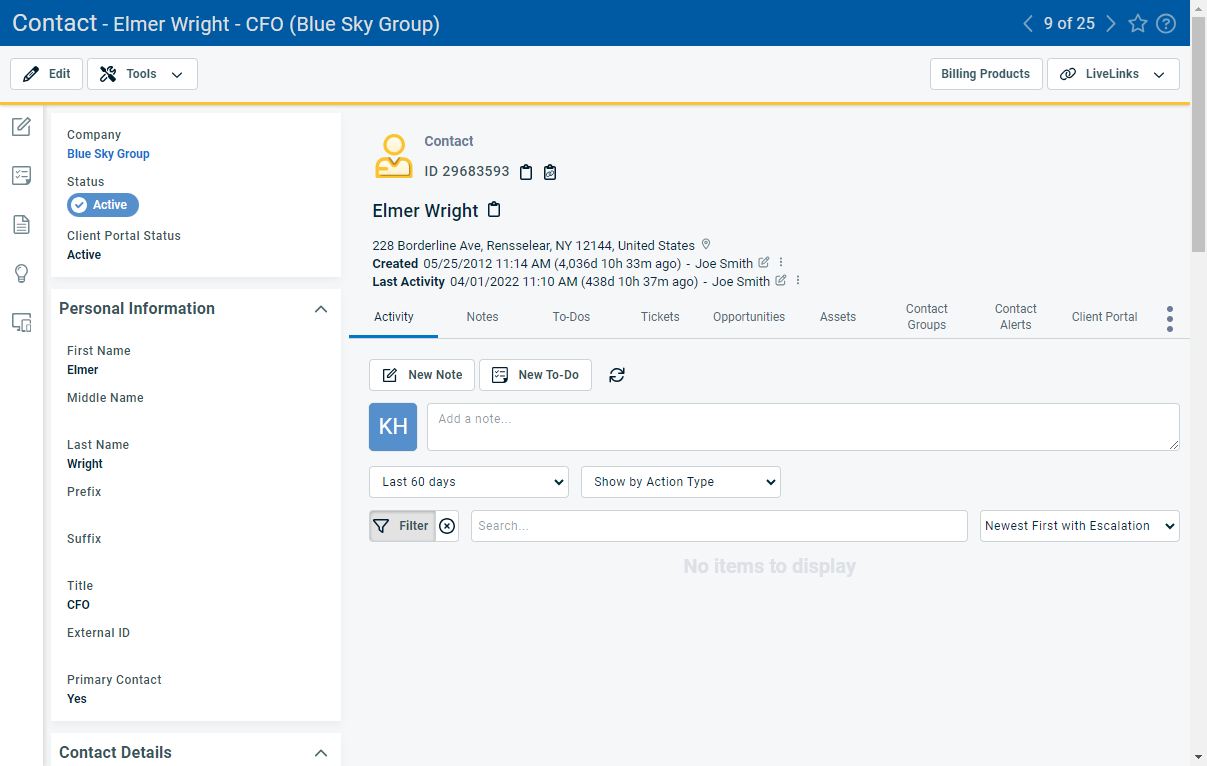
The Contact page
PERMISSIONS Security level with access to CRM
NAVIGATION Main search > Contact (Last Name) or Contact (First Name) or Contact (Email)
The Contact page presents the subset of organization information that is associated with this contact. To open the page, use the path(s) in the Security and navigation section above. To access information directly related to the Organization entity (Sales Orders, Invoices etc.), click the organization name to open the Organization page. Refer to The Organization page.
Any messages or banners associated with the contact, such as contact alerts, appear above the panels. For more information on creating and managing contact alerts, refer to The Organization and Contact Alerts tabs. 
If the contact (or the contact associated with the opportunity or to-do you are viewing or editing) has opted out from receiving sales solicitations, you will see a pink banner displayed at the top of the page. On an opportunity, this banner appears if the associated contact has opted out of sales solicitations, even if the contact field is hidden by the opportunity's category.
IMPORTANT Note for partners in the European Union: Under the EU General Data Protection Regulation, your customers have a right not to be contacted that is enforced by steep penalties. This banner enables you to distinguish customers who have opted out, but you must implement business practices to comply with the Regulation.
If the contact was previously erased (redacted), you'll see an informational banner at the top of the Contact page. Although you can edit redacted contacts, doing so will not unredact them. To learn more, refer to Erasing (redacting) contacts and resources.
In all tab views, a summary of the contact's details, including their unique ID, name, photo, and contact information appears above the tab bar at the top of the Contact page. Extended contact information appears in the panel on the left side of the page.
Because contacts do not have categories, all fields on a contact will appear regardless of whether they are in use. For field descriptions, refer to Adding and editing contacts.
Below the title bar is a row of action buttons. The visibility of the buttons will depend on the features your Autotask administrator has enabled and on your security level.
| Name | Description |
|---|---|
| Edit | Click Edit to open the Edit Contact page to modify contact information. Refer to Adding and editing contacts. |
| Tools | The following options appear in the Tools menu:
IMPORTANT This option will be unavailable to users who do not have an appropriate security level. For more information, refer to Creating or editing a custom security level. |
| Billing Products | Click to open the Billing Products/Rules page for the contact. This button is visible if the contact is associated with a billing product AND the user viewing the contact has full contract visibility. Refer to Manually selecting and reviewing billing products. |
| LiveLinks | Click to view a list of the LiveLinks available to you from this page. |
Additional actions are possible from the Quick Add bar on the left side of the page. To learn more, review our Quick Add bar topic.
The Contact page contains a tab bar that displays entities related to the contact. You can access any of the available views by selecting the corresponding tab.
For more information on the various tab views, refer to the following articles:
| Tab name | Documentation link |
|---|---|
| Activity | The Activity tab |
| Co-managing User | The Co-managing User tab |
| Notes | The Notes tab |
|
To-Dos |
The To-Dos tab |
| Tickets | The Tickets tab |
| Opportunities | The Opportunities tab |
| Devices | The Devices tab |
| Contact Groups | The Contact Groups tab |
| Contact Alerts | The Organization and Contact Alerts tabs |
| Client Portal | The Client Portal tab |
| Co-managing User | The Co-managing User tab |
|
|
Click this option to see additional tabs and to customize the tab order. |


